Four channel power amplifier
1. Introduction
I am a big fan of surround sound. Up until the moment I finished this amp, I was using two two-channel amplifiers to power four speakers. This was very annoying, because it meant I had two volume controls. This invariably meant that the balance between front and rear was off. Added to this, was that the amplifier for the rear speakers was not very good. It produced too much noise, and allowed clicks and pops from the power grid through, to be amplified and heard. I decided I was going to build a four channel power amplifier, and later a pre-amplifier to feed it. You might wonder why I didn't choose to make a five channel one instead. This is because I don't see the use of the center channel. I will probably write an article detailing why, but for now, suffice it to say that four channels is enough for 2 dimensional sound, which is what 5.1 is as well.
Rod Elliott has designed a very good and simple power amplifier in the form of P3a. Even though he offers excellent PCB's for sale, I decided I was going to design my own, for the learning experience. I knew this could cause problems, but I wanted to improve more than my soldering skills. It took a few redesigns and rebuilds, but I got to know a lot more about amplifier design in the process.
2. Design
2.1. Power
There basically are two versions of the P3a: a 60W into 8 Ohm (using ±35V supply rails) and a 100W into 8 Ohms (using ±42V supply rails). I decided to build the ±35V version, for two reasons. One is that 60W is more than enough. The other is that the ±42V version can't drive 4 Ohm speakers. I wanted the option of driving 4 Ohm speakers, so the choice was easy. At ±35V, it can drive about 60W into 8 Ohms, and 100W into 4 Ohms.
2.2. Transistors
The recommended transistors are not available here, so I went for one of the previous recommendations. For the output transistors, I used MJ15003 and MJ15004. For the three drivers, I used two BD140's (one class-A driver and one output driver) and one BD139 (the other output driver).
2.3. Power supply
The power supply consists of one 625 VA 25-0-25 transfomer, one 35A bridge rectifier and 4x 10.000 µF filter capacitors. This seems like overkill, and it may be for all practical purposes, but it is what is theoretically required to drive four 100W (into 4 ohms) amplifiers at about 70% efficiency.
The heavy power supply demands the use of a softstarter, for which I used Rod Elliott's P39. I chose the ballast resistors so that their maximum current use is 200% of the maximum of the transfomer. That way, the main fuse will still blow when there is something wrong with the transformer. Additionally, I attached a thermal fuse to the resistors via a piece of aluminum and thermal epoxy, for extra safety.
2.4. DC protection
As always, an amplifier is not complete without DC protection, and I have included Rod Elliott's P33 for that. See the DC-protector section of my subwoofer article for more details on this particular circuit.
3. Problems
There was one problem with this amp I was determined to get rid off. This was a slight buzz (not hum), most audible in the rear right channel. It took a lot of experimentation and wrong conclusions, but I finally figured out that the buzz appeared when more than one of the four inputs was connected to a source. This led to me conclude that a ground loop was being formed between the amplifier and the signal source. The solution was simple: put 10 Ohm resistors between the individual amplifiers and the input cable shield which connects to the external connector. The following image illustrates that:
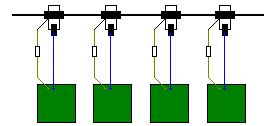
Signal ground isolation.
4. Performance
I am very pleased with the performance. However, in my opinion, amplifiers don't influence the sound quality by much (as long as they are of decent design), and therefore, I didn't expect much of a difference with my previous one (which is a 1978 Kenwood receiver). Aspects that are most noticable are things like noise and hum level, which are quite good. There is a very very very slight hum present in the speakers, but you need to press your ear against the speakers to hear it. I determined that this hum is inherent to the P3a design, so there is not much I can do about it, as far as wiring or power supply configuration is concerned. But because it's so marginal, it doesn't matter. In the end, the amplifier is exactly what I needed it to be, and it performs accordingly.
5. Photographs
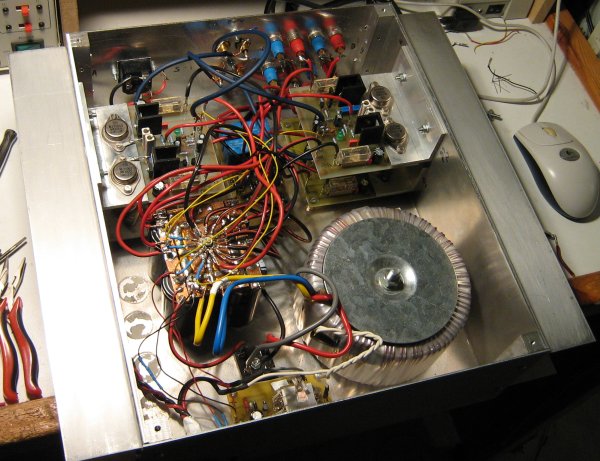
Here are some photographs. I don't have a lot of good ones, so for the moment, these two will have to do.
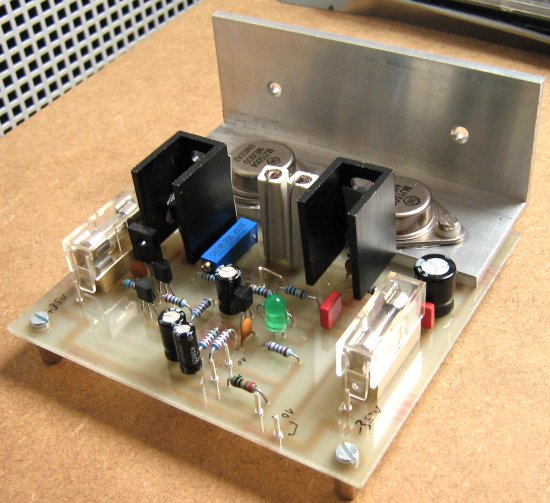
Mono amplifier module.
Complete amplifier.